


Why positioning is the foundation of a diagnostic equine limb X‑ray
Equine limb radiography is deceptively unforgiving. A few millimeters of motion blur, a subtle rotation, or a limb that isn’t truly weight‑bearing can:
- Hide small fractures or chip fragments
- Distort joint spaces (especially fetlock, carpus, hock)
- Make osteophytes look worse—or disappear entirely
- Turn a follow‑up series into apples‑to‑oranges
Good positioning gives you true anatomy. Great positioning gives you repeatable anatomy.
Safety first: people, horse, radiation
Before you think about views and angles, lock in these basics.
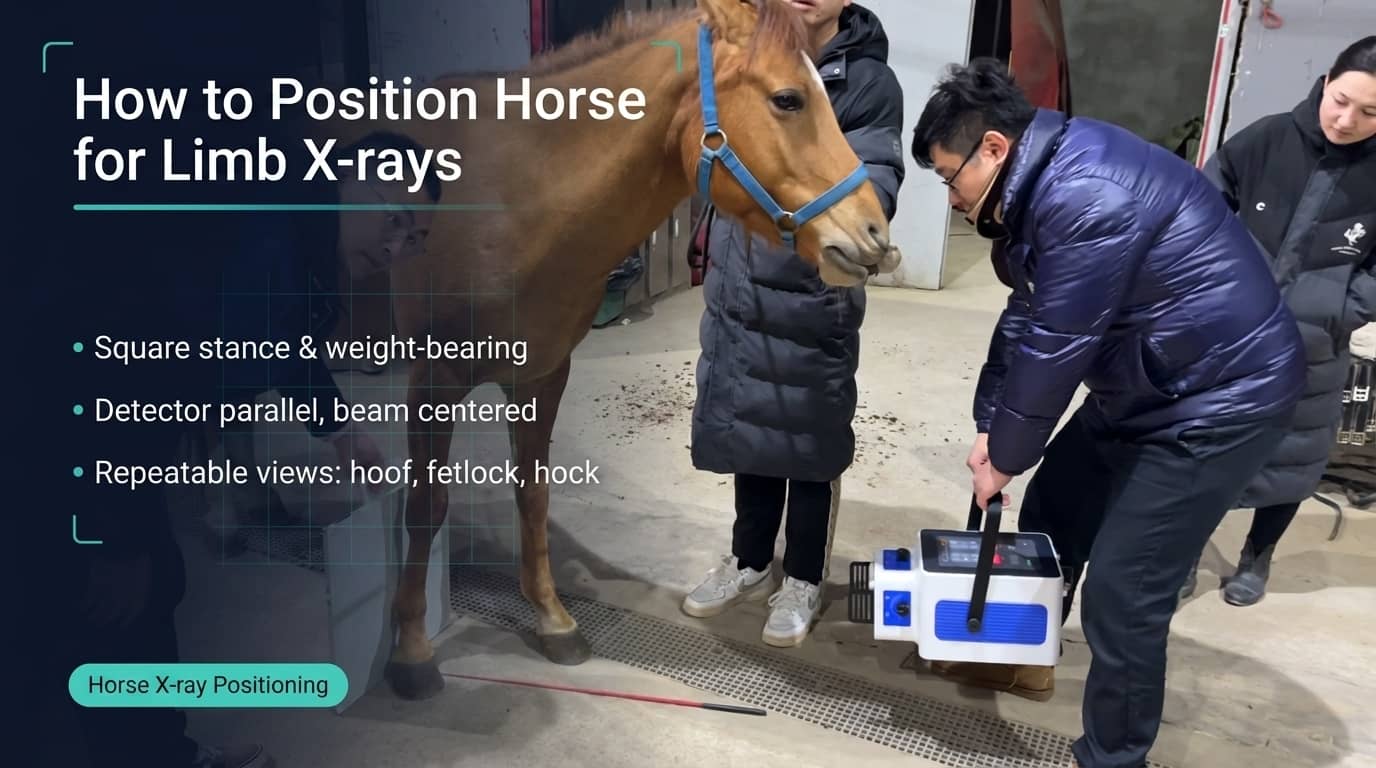
1) Restraint and horse comfort
- Use a competent handler with a lead rope and gloves.
- Consider sedation if your veterinarian recommends it—some horses simply cannot stand quietly enough for a high‑quality equine x ray series.
- Reduce distractions: quiet area, non‑slip footing, minimal traffic.
- Keep the session efficient. Horses tolerate short, purposeful sessions better than long, fussy ones.
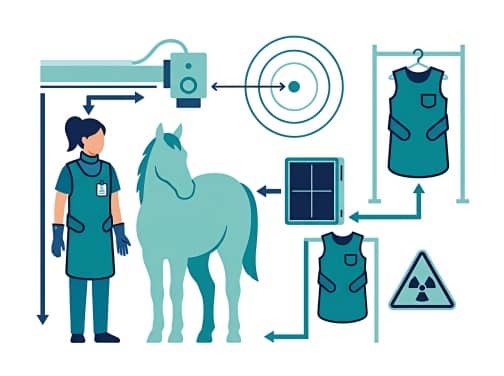
- Wear appropriate PPE: lead apron, thyroid collar, gloves, and dosimeter.
- Maximize distance and avoid primary beam exposure.
- Use positioning aids rather than hands whenever possible.
- Collimate tightly—better images and less scatter.
- Weight‑bearing matters. Most limb views should be taken with the limb bearing weight unless the view is specifically flexed.
- Square stance. “Square” means both forelimbs or hindlimbs are aligned, not camped under or stretched out.
- Repeatable landmarks. Choose consistent reference points: heel bulbs, frog apex, coronary band, accessory carpal bone, calcaneus.
2) Radiation safety essentials
- Wear appropriate PPE: lead apron, thyroid collar, gloves, and dosimeter.
- Maximize distance and avoid primary beam exposure.
- Use positioning aids rather than hands whenever possible.
- Collimate tightly—better images and less scatter.
3) Ground rules for limb positioning
- Weight‑bearing matters. Most limb views should be taken with the limb bearing weight unless the view is specifically flexed.
- Square stance. “Square” means both forelimbs or hindlimbs are aligned, not camped under or stretched out.
- Repeatable landmarks. Choose consistent reference points: heel bulbs, frog apex, coronary band, accessory carpal bone, calcaneus.
Equipment and setup checklist for horse limb X‑rays
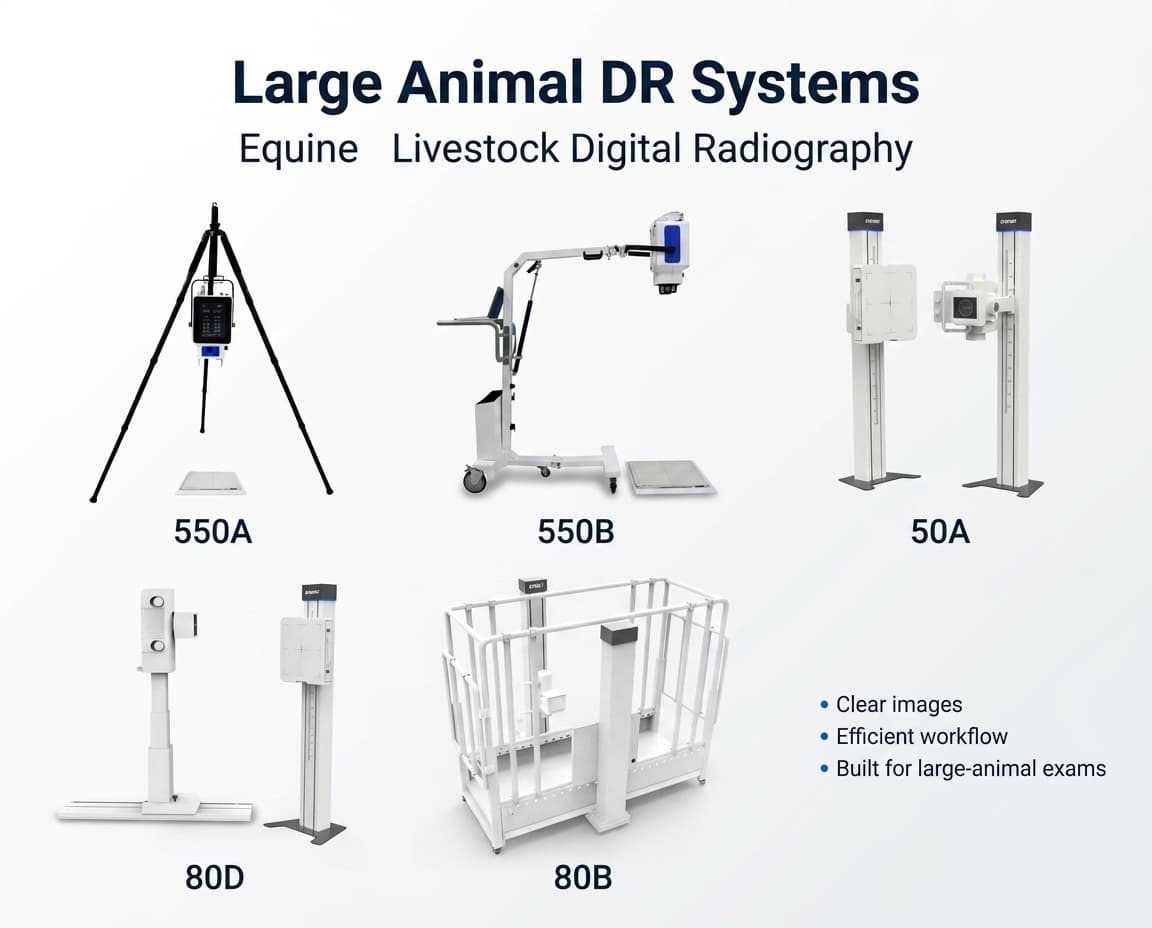
For clinics and field teams, the most common workflow today is equine DR (digital radiography): a portable X‑ray generator paired with a wireless flat panel detector (FPD) and imaging software. If you sell or recommend equipment, this is where you can naturally add internal links to your horse DR / portable DR X‑ray machine pages.
Typical Veterianry DR / equine X‑ray kit:
- Portable horse DR X‑ray machine / portable X‑ray generator (battery-powered options are popular for barns and mobile practice)
- Wireless DR flat panel detector (often called a wireless FPD or digital detector plate) in a protective sleeve
- Laptop/tablet with DR acquisition software (image stitching/processing varies by system)
- Marker set: R/L, view marker (optional), plus a metal calibration marker when measurements are needed
- Positioning aids: hoof blocks, wedges, flat blocks
- Plate stabilization: sandbags/foam pads
- Cleaning basics: towel/brush to remove mud from hoof wall and sole
- Simple workflow helpers: chalk/tape to mark foot placement on the floor
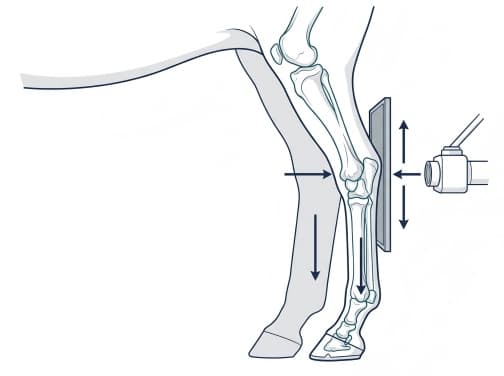
The core principle: align the limb, then align the beam
If you remember one thing, make it this:
- Make the limb true (straight, weight‑bearing, minimal rotation)
- Place the detector parallel to the area of interest
- Center the beam on the joint/region
- Collimate to the smallest practical field
Do not “fix” poor limb alignment by changing the beam angle. That’s how distortion sneaks in.
How to position a horse for forelimb X‑rays
Forelimb studies commonly include the hoof, pastern, fetlock, cannon, carpus, and sometimes elbow.
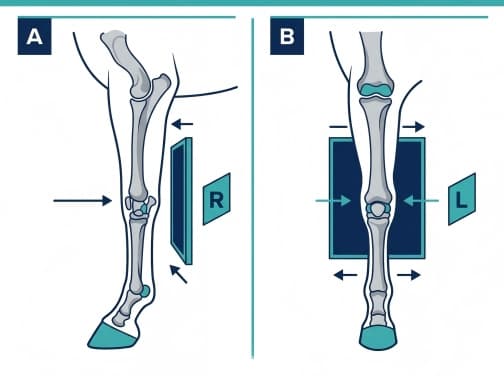
A) Hoof (foot) radiographs: lateromedial (LM) and dorsopalmar (DP)
Goal: A true side view (LM) and true front‑to‑back view (DP) without rotation.
Positioning steps (LM):
- Place the hoof on a flat block so the foot is stable and clean.
- Ask the horse to stand square; ensure the opposite forelimb is not taking all the weight.
- Align the cannon bone vertical; check that the toe isn’t turned in or out.
- Place the detector on the medial side or lateral side depending on protocol; keep it parallel to the hoof.
- Center at the middle of the hoof capsule (often around the distal phalanx region).
Common errors:
- Toe rotated (gives “false” joint and hoof balance impression)
- Limb not weight‑bearing (changes solar angle and joint spacing)
- Plate not parallel (distorts hoof wall thickness)
Positioning steps (DP):
- Keep the hoof square, frog centered.
- Detector behind the foot (palmar) for DP, depending on your system.
- Center on the coffin joint region; collimate tightly.
B) Fetlock radiographs: LM, dorsopalmar/dorsoplantar (DP), and obliques
LM positioning (fetlock):
- Horse stands square.
- Limb vertical and weight‑bearing.
- Detector parallel to the sagittal plane of the fetlock.
- Center at the fetlock joint space.
Obliques (DMPLO / DLPMO):
- Keep the limb true; rotate the beam as your protocol dictates.
- Mark views clearly—obliques are easy to mix up.
Common errors:
- Horse leaning away from the detector
- “Soft” stance causing the fetlock to sink and joint space to change
C) Carpus (knee): positioning for clean joint spaces
The carpus is where small rotations cause big interpretive headaches.
Positioning basics:
- Square stance, forelimb vertical.
- Detector on a stand if possible to avoid tilt.
- Center on the middle carpal joint for standard series (follow vet protocol).
Key detail: Ensure the horse is not resting the limb. A slightly flexed carpus can mimic pathology.
How to position a horse for hindlimb X‑rays
Hindlimb imaging adds a new challenge: horses frequently shift weight behind them, and hocks love to rotate.
A) Hock (tarsus): lateromedial (LM) and dorsoplantar (DP)
LM positioning (hock):
- Stand the horse square behind.
- Ensure the hock is in a natural, weight‑bearing posture—not flexed.
- Check the toe: it should not be rotated outward (a common habit).
- Detector parallel to the hock; center on the tarsocrural joint unless otherwise directed.
DP positioning (hock):
- Keep the limb straight.
- Avoid hip swing. If the horse swings the hip, the hock rotates and your joint spaces lie.
B) Stifle: positioning tips to reduce repeat exposures
Stifle radiographs can be frustrating because of muscle mass and motion.
- Prioritize calm restraint; sedation is common.
- Keep the limb weight‑bearing for standard views.
- Use consistent centering landmarks (patella, femorotibial joint line).
Flexed and stress views: when “not square” is the point
Flexed views are intentionally non‑neutral. The trick is to be purposeful.
- Confirm with the veterinarian which joints require flexion and how much.
- Stabilize the plate first; then flex.
- Move the horse as little as possible between exposures.
If you don’t know the exact flexion protocol, don’t improvise. Flexion changes anatomy dramatically, and inconsistency can mislead.
Marker placement and labeling: small habits, big clarity
A diagnostic horse x ray should be interpretable months later by someone who wasn’t there.
- Always place R/L markers and keep them out of the area of interest.
- If using obliques or special views, label the view.
- Use a calibration marker when measurements or surgical planning is likely.
Troubleshooting: why your equine limb X‑rays look “off”
Problem: Joint space looks uneven
Likely cause: Limb rotation or horse not square.
Fix: Reset stance, check toe direction, and ensure weight‑bearing.
Problem: Anatomy looks stretched or compressed
Likely cause: Detector not parallel, beam not centered.
Fix: Re‑align detector and re‑center; collimate.
Problem: Motion blur
Likely cause: Horse shifting, handler repositioning, long exposure.
Fix: Improve restraint, simplify the workflow, reduce exposure time if protocol allows.
Problem: Repeats keep happening
Likely cause: No consistent routine.
Fix: Create a standard sequence (setup → square stance → plate → marker → center → collimate → shoot). Repeat it every time.
Quick reference: positioning checklist
FAQ: positioning horses for limb radiographs
How do you keep a horse still for X‑rays?
Use skilled handling, minimize distractions, keep sessions short, and consider sedation under veterinary direction. Stable footing and a calm environment reduce movement more than people expect.
Should the limb be weight‑bearing for a horse limb X‑ray?
For most standard limb radiographs, yes—weight‑bearing provides the most anatomically truthful joint spacing and alignment. Exceptions include flexed views and specific projections ordered by the veterinarian.
What’s the most common positioning mistake in equine X‑rays?
Subtle rotation: the toe turned in/out, the cannon not vertical, or the horse leaning. These small shifts can dramatically change joint space appearance.
Can you take limb X‑rays without sedation?
Often yes, especially for cooperative horses and distal limb (hoof/fetlock) views. For painful injuries, anxious horses, or stifle/hock series, sedation may be recommended by the attending veterinarian.
Post time: Apr-16-2026