


Animal ultrasound is a non-invasive technique that provides cross-sectional anatomy of abdominal organs based on differences in acoustic impedance.
Performing a diagnostic ultrasound evaluation requires attention to detail, and the factors for obtaining optimal ultrasound scanning results are influenced by the following.
There are 7 basic controls that the user must understand when performing an abdominal ultrasound:
On/off or power switch
Probe adjustment
Frequency adjustment
Depth adjustment
Focus adjustment
Gain adjustment + Time Gain Compensation (TGC) or Depth Gain Compensation (DGC)
Image contrast setting (i.e. dynamic range or logarithmic compression)
Probe and Setup Selection
Select the probe and preset to image the critter. Most small animals can initially be imaged using a microconvex surface array transducer. If a linear array transducer is used, the total coverage time in contact with the skin is much longer (sometimes up to 5 cm), so the coupling gel becomes more critical. Scanning can be performed after selecting a given preset.
Depth and focus area control
The 2 most common controls adjusted in each study are depth and focus area, which go hand in hand. Depth adjusts to the organ of interest. For example, an evaluation of the kidneys may only require a depth of 3 cm, while an evaluation of the entire liver may only require a depth of 6 to 7 cm.
Each ultrasound beam (primary beam) is narrowest in the focal area and then deepens or widens toward the focal area. Focal area:
Provide the best detail in the x-direction, as this is the thinnest part of the US beam
Should be set at or just below the region or organ of interest
Usually shown as a triangle or arrow that can be moved between the near and far field.
Sensor position and frequency
Position
Depending on the anatomy of the dog or cat, the transducer is placed perpendicular to the skin over the region of interest. For example, if evaluating a cat’s spleen, the transducer is placed caudally on the left side of the costal arch and posteriorly on the lateral abdomen, and the spleen is visualized in a shallow field.
Place the transducer so that the area of interest is as close to the surface as possible.
If there is an abnormality, always examine in both imaging planes (long and short axis).
Frequency
Use the highest frequency on the multifrequency transducer first. Higher ultrasound frequencies will provide better resolution, but will not go as deep as lower frequencies.
Understand the limitations of your transducer’s highest frequency: the sonographer can only scan as deep as the probe can go. It may be necessary to use a low-frequency probe to scan deeper in the chest or deeper structures in large dogs or the entire abdomen.
Higher frequency probes (e.g., linear transducers) provide better spatial resolution than curved array transducers for two reasons: linear transducers (1) typically have higher frequencies and (2) their US beams do not diverge at depth.
Note that each transducer has a marker that indicates the orientation of the US beam relative to the image. The marker is different for each machine, but it is customary to note that the marker should be placed on the skull when the transducer is oriented parallel to the long axis of the dog or cat.
Gain Adjustment
Use the gain adjustment and the TGC or DGC controls to adjust the overall image brightness. Keep in mind, however, that this is a post-processing technique that improves the overall whiteness of the screen.
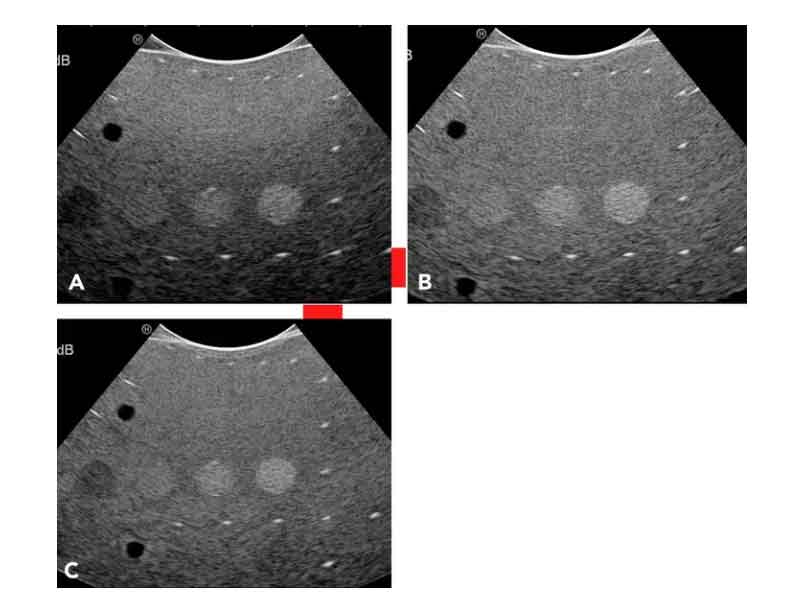
In A, the overall gain setting is normal (usually about 60%). In B, the overall gain setting is too low, resulting in an overall low echo image (gain setting of 50%). In C, the overall gain setting is too high, resulting in an overall high echo image (gain set to 78%). These gain values are specific to your veterinary ultrasound machine; therefore, be sure to adjust the overall gain appropriately for your machine.
When using the TGC or DGC settings: use the middle range as a starting point for the settings; then adjust the sliders from a straight vertical position to a smaller angle, with the top slider set to the left (to reduce the overall gain in the near field) and the bottom slider set to the right (to increase the overall gain in the far field) ). This should compensate for the loss of US wave numbers deep within the tissue.
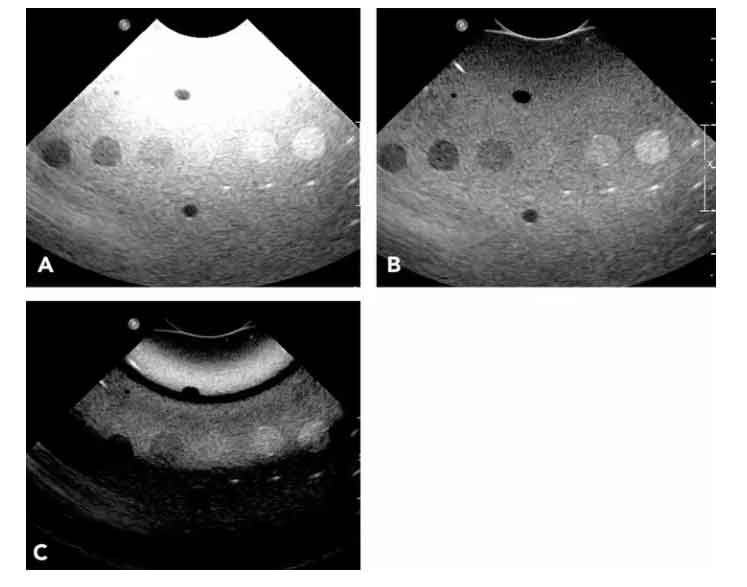
Image processing using TGC or DGC curves. In A, the near-field TGC slider is moved too far to the right, resulting in a “white” near-field. In B, the near-field TGC slider has been moved so far to the right that the overall echogenicity of the phantom looks uneven and too dark near the transducer. In C, the sliders dedicated to the 1, 3, and 4 cm distance markers have been set to the far left, so there is no image at all.
Dynamic Range Control
Dynamic range (or logarithmic compression or contrast) controls the overall gray scale of the image.
A higher contrast image (A) and a higher latitude or gray scale image (B) for the abdomen.
A short dynamic range results in a black-and-white with few shades of gray, as one would use for echocardiographic images.
A long dynamic range has little contrast and a long gray scale, and results in many shades of gray; subtle lesions may not be apparent.
A moderate dynamic range is desirable in the abdomen.
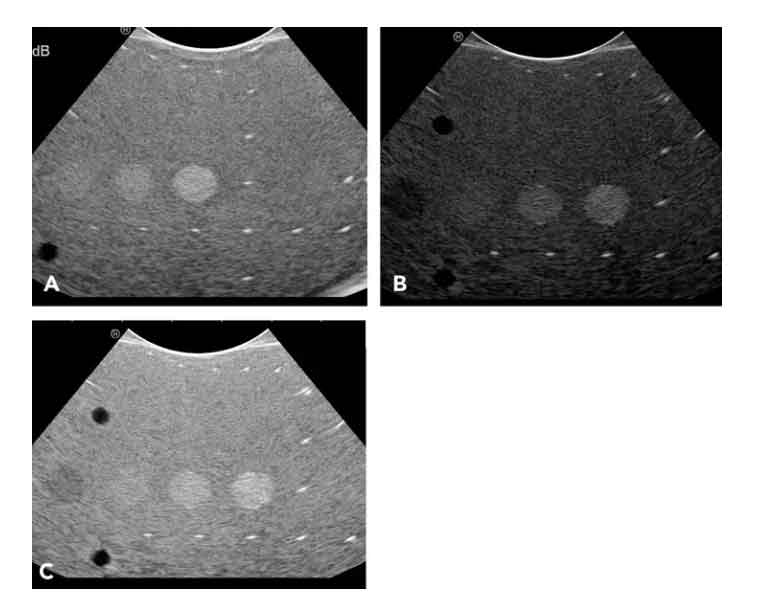
Dynamic range is reduced (50 dB), resulting in too much contrast (A); dynamic range is set in a midrange position (70 dB), resulting in an appropriate appearance (B); dynamic range is increased (90 dB), providing too much gray and not enough contrast resolution (C).
To increase the visibility of the lesion, the user can either decrease the dynamic range (increase the contrast) or use a B-color map, in which shading (blue, yellow, magenta) is used instead of grayscale.
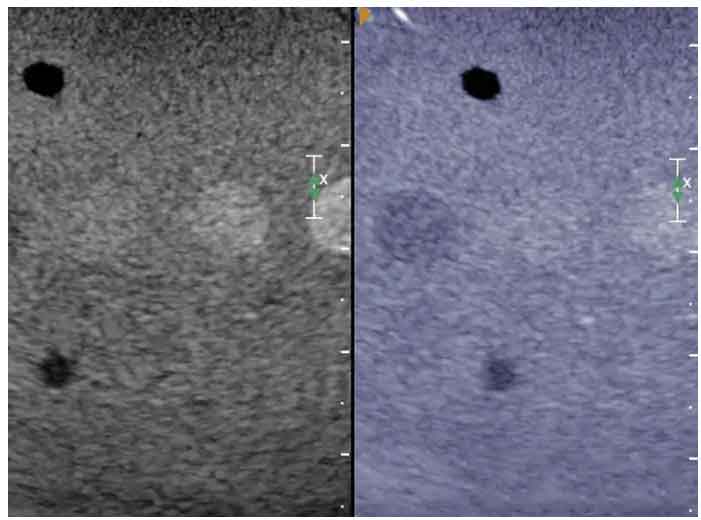
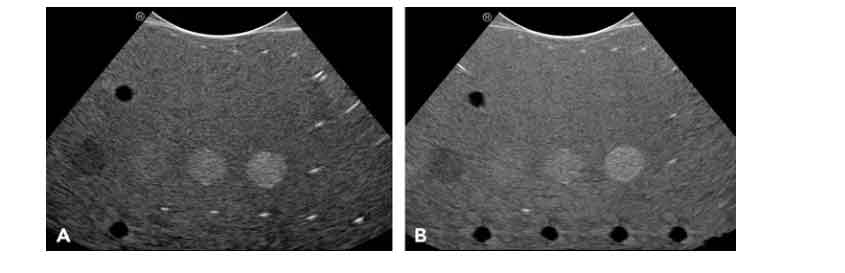
The premise of B-color is that in the human retina, there are more cone cells than rods, and therefore better color shading than shades of gray can be seen. Shown are 2 images of the same section. The subtle “isoechoic” nodule in the middle appears in the grayscale image on the left, while the blue image on the right provides color contrast, thus improving the visibility of the same nodule.
In summary
Animal ultrasound image optimization is not complicated, but unfamiliarity with the controls and terminology may make it difficult for novices to get started. Use the user manual to learn how to use the controls on your veterinary ultrasound machine. to familiarize yourself with all the controls and become comfortable operating the veterinary ultrasound machine and obtaining diagnostic images of different sized animals.
DGC = depth gain compensation; TGC = time gain compensation
Post time: Apr-23-2024